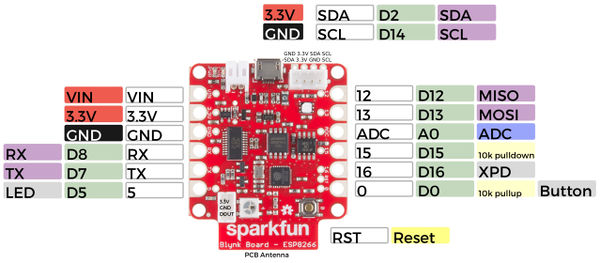
Difference between revisions of "Blynk"
From Digipool-Wiki
| Line 11: | Line 11: | ||
[https://learn.sparkfun.com/tutorials/getting-started-with-the-sparkfun-blynk-board?_ga=1.196250085.890988720.1429644996 SparkFun-Tutorial] | [https://learn.sparkfun.com/tutorials/getting-started-with-the-sparkfun-blynk-board?_ga=1.196250085.890988720.1429644996 SparkFun-Tutorial] | ||
| + | |||
| + | <br> | ||
| + | |||
| + | == Sparkfun-Blynk-ESP8266 Onboard-NeoPixel == | ||
| + | |||
| + | <pre> | ||
| + | |||
| + | // Sparkfun-Blynk-ESP8266 Onboard-NeoPixel | ||
| + | |||
| + | #define BLYNK_PRINT Serial | ||
| + | #include <ESP8266WiFi.h> | ||
| + | #include <BlynkSimpleEsp8266.h> | ||
| + | #include <Adafruit_NeoPixel.h> | ||
| + | |||
| + | // You should get Auth Token in the Blynk App. | ||
| + | // Go to the Project Settings (nut icon). | ||
| + | char auth[] = "0zKSLFgemTMIbKmSZ_4Geh4ovGlCdQZr"; | ||
| + | |||
| + | // Your WiFi credentials. | ||
| + | // Set password to "" for open networks. | ||
| + | char ssid[] = "www_catrineval_de"; | ||
| + | char pass[] = "fussball11"; | ||
| + | |||
| + | #define PIN 4 | ||
| + | int stripR = 0; | ||
| + | int stripG = 0; | ||
| + | int stripB = 0; | ||
| + | int stripL = 0; | ||
| + | |||
| + | Adafruit_NeoPixel strip = Adafruit_NeoPixel(1, PIN, NEO_GRB + NEO_KHZ800); | ||
| + | |||
| + | BLYNK_WRITE(V1) | ||
| + | { | ||
| + | stripR = param[0].asInt(); | ||
| + | stripG = param[1].asInt(); | ||
| + | stripB = param[2].asInt(); | ||
| + | showRGB(); | ||
| + | } | ||
| + | |||
| + | BLYNK_WRITE(V2) | ||
| + | { | ||
| + | stripL = 255 - param.asInt(); | ||
| + | showRGB(); | ||
| + | } | ||
| + | |||
| + | void showRGB() { | ||
| + | int r = stripR - stripL; | ||
| + | if (r < 0) r = 0; | ||
| + | int g = stripG - stripL; | ||
| + | if (g < 0) g = 0; | ||
| + | int b = stripB - stripL; | ||
| + | if (b < 0) b = 0; | ||
| + | |||
| + | strip.setPixelColor(0, strip.Color(r, g, b)); | ||
| + | strip.show(); | ||
| + | } | ||
| + | |||
| + | void setup() | ||
| + | { | ||
| + | // Debug console | ||
| + | Serial.begin(9600); | ||
| + | Blynk.begin(auth, ssid, pass); | ||
| + | |||
| + | strip.begin(); | ||
| + | strip.show(); | ||
| + | } | ||
| + | |||
| + | void loop() | ||
| + | { | ||
| + | Blynk.run(); | ||
| + | } | ||
| + | |||
| + | |||
| + | </pre> | ||
| + | |||
| + | <br> | ||
Revision as of 17:21, 15 January 2021
Setup
- Install the Blynk App on your Phone
- Creat an Account and log in
- Scann the QR-Code
- Follow the steps
- If the App is connecting to your Blynk board, open WLAN-Setting and select the boards WLAN by hand
Sparkfun-Blynk-ESP8266 Onboard-NeoPixel
// Sparkfun-Blynk-ESP8266 Onboard-NeoPixel

#define BLYNK_PRINT Serial
#include <ESP8266WiFi.h>
#include <BlynkSimpleEsp8266.h>
#include <Adafruit_NeoPixel.h>

// You should get Auth Token in the Blynk App.
// Go to the Project Settings (nut icon).
char auth[] = "0zKSLFgemTMIbKmSZ_4Geh4ovGlCdQZr";

// Your WiFi credentials.
// Set password to "" for open networks.
char ssid[] = "www_catrineval_de";
char pass[] = "fussball11";

#define PIN 4
int stripR = 0;
int stripG = 0;
int stripB = 0;
int stripL = 0;

Adafruit_NeoPixel strip = Adafruit_NeoPixel(1, PIN, NEO_GRB + NEO_KHZ800);

BLYNK_WRITE(V1)
{
  stripR = param[0].asInt();
  stripG = param[1].asInt();
  stripB = param[2].asInt();
  showRGB();
}

BLYNK_WRITE(V2)
{
  stripL = 255 - param.asInt();
  showRGB();
}

void showRGB() {
  int r = stripR - stripL;
  if (r < 0) r = 0;
  int g = stripG - stripL;
  if (g < 0) g = 0;
  int b = stripB - stripL;
  if (b < 0) b = 0;

  strip.setPixelColor(0, strip.Color(r, g, b));
  strip.show();
}

void setup()
{
  // Debug console
  Serial.begin(9600);
  Blynk.begin(auth, ssid, pass);

  strip.begin();
  strip.show();
}

void loop()
{
  Blynk.run();
}
